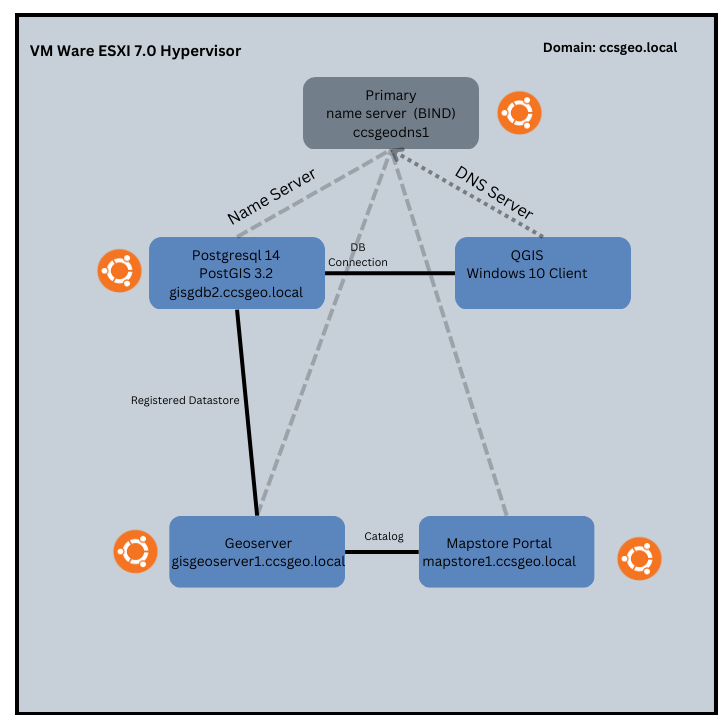
The foundation of any open source GIS stack is PostgreSQL with the PostGIS extension. In part 1 of this series, I laid out the deployment architecture and spun up some Ubuntu Server virtual machines on VMWare ESXI. There are a few steps to deploy the database so that it can be used as a GIS database in QGIS and Geoserver.
- Install PostgreSQL.
- Install PostGIS.
- Configure PostgreSQL connections.
- Set up postgres user.
- Configure allowed authentication.
- Create GIS database
- Activate PostGIS on database.
- Create new GIS user and GIS data schema.
- Ensure connection from QGIS are successful.
So let’s get started!
Install PostgreSQL
Installing PostgreSQL on Ubuntu is pretty straightforward:
$ sudo apt install postgresql
Install PostGIS
Installing PostGIS is also pretty straightforward:
$ sudo apt install postgresql-14-postgis-3
Configure PostgreSQL Connections
Once we have installed PostgreSQL, we have to configure it to allow connections from other machines. This is done through the postgresql.conf file. Using nano, a built-in command line text editor, we can modify the file:
$ sudo nano /etc/postgresql/14/main/postgresql.conf

Here we can set the listen_address to ‘*’ so that the PostgreSQL server listens for all incoming ip addresses. You can modify this for your own network configuration but this is an easy catch-all for a development environment.
Setup Postgres User
By default, when PostgreSQL is installed on Linux, it creates a user called postgres at the OS level. This user has access to the database via peer authentication, which allows a user logged in at the OS level to log in to the database if there is a corresponding user present. Initially there is no password required and you can access the database on the local machine via:
$ sudo -u postgres psql
We can then set a password for the database user using the ALTER ROLE sql command:

This password will not be required to sign in when accessing the database from the local machine, but we will need it later on when accessing the database from a remote machine (such as where QGIS is installed).
Modify pg_hba.conf
Our final configuration step is to modify the pg_hba.conf file which allows us to connect to the database using the postgres user configured with a password from a remote machine:
$sudo nano /etc/postgresql/14/main/pg_hba.conf
At the bottom, I added hostssl all all 0.0.0.0/0 scram-sha-256:

You can narrow the IP range down to reflect your local network subnet. The hostssl parameter only allows for ssl connections and uses the scram-sha-256 method for authentication. Now, we can restart the PostgreSQL service to lock in our changes:
$ sudo systemctl restart postgresql.service
To test the connection, I installed pgAdmin on my desktop. You can then right-click on Servers > Register and enter in the database information:

Success!

Create GIS Database
Now we can create a database where we will store our geographic data. You can do this easily through pgAdmin (Right-click Databases > New Database) or through the command prompt on the database machine. First, sign in:
$sudo -u postgres psql
Then use the CREATE DATABASE command:
CREATE DATABASE gisgdb2;
If we have a look at pgAdmin, we should be able to see the new database:

In order to enable our database to store geographic information, we also need to add the PostGIS extension to the database. You can do this by using the CREATE EXTENSION command:

Now we have a PostGIS enabled PostgreSQL database we can use for all of our mapping needs! There are just a few other things to take care of.
Create new GIS user and GIS data schema
You could technically just use the postgres user and the default public schema to store and access your geographic data. However, I want to model this a bit more like an organization would. So I am going to create a specific GIS user that has their own schema for storing and accessing data. On the PostgreSQL machine, log in to the database:
$ sudo -u postgres psql
Create a new user:
CREATE USER ccsgeoprod WITH encrypted password ‘ccsgeoprod’;
Switch into the database created in the step above:
postgres=# \c gisgdb2
Grant all privileges to the new user on this database:
gisgdb2=# GRANT ALL PRIVILEGES ON DATABASE gisgdb2 TO ccsgeoprod;
Create a schema with the same name as the user:
CREATE SCHEMA AUTHORIZATION ccsgeoprod;
Be sure to test your new user by connecting to the database via pgAdmin.
Connect to the Database in QGIS
The final step is to make sure that we can actually make a connection to the new database with the ccsgeoprod user and load some data! To create a database connection in QGIS, navigate to the PostgreSQL option in the Browser > Right-click > New Connection:

As my hba_conf file is configured with the hostssl option, I had to set the SSL mode to ‘allow’. In the Authentication section, I chose basic and entered in the username and password for ccsgeoprod. The test connection was successful and I can now see the two available schemas in the Browser:

I then used the Export to PostgreSQL data loading tool to load a shapefile to my new database:


Success!
Conclusion
In this part of deploying an open source GIS stack, we stepped through downloading PostgreSQL, configuring connections, creating a database, enabling PostGIS, creating users and schemas, and loading data through QGIS. This database will give us a solid platform for being able to publish and serve out web services via Geoserver, as well as manage and work with our geographic data through QGIS. Stay tuned for part three – deploying Geoserver.


