Every year, our company hosts an auction for old IT assets to help raise money for the United Way. For a while now, I have been wanting to buy an old laptop with at least some half decent resources. I only ever had a vague idea of what for, but I knew that it would be really cool to be able to boot up a hypervisor and have the ability to create virtual machines whenever I wanted. And after stumbling across a Network Chuck video on setting up VMWare ESXI on an old server, I figured this was a great plan. I managed to purchase an old Dell Precision 7520 with 4 hyperthreaded CPU cores, over a TB of space and 32 GB of RAM. And over the past month or so, I have had a desire to explore the open source GIS world and learn more about IT infrastructure in the process. So I thought, why not deploy a full Open Source GIS stack for development and testing?
Architecture
I sometimes still can’t believe that Linux exists as a free operating system. It is wild. In the spirit of open source, the core machines of my stack will run on Ubuntu Server 22. I also want my machines to have proper domain names, so I will need a domain name server. For the database, Postgresql with PostGIS is the clear choice. For the GIS server – Geoserver, with a Mapstore web client for sharing web maps. For now I will continue to use my install of QGIS on my desktop Windows 10 machine, with the possibility of moving it to Ubuntu Desktop in the future.
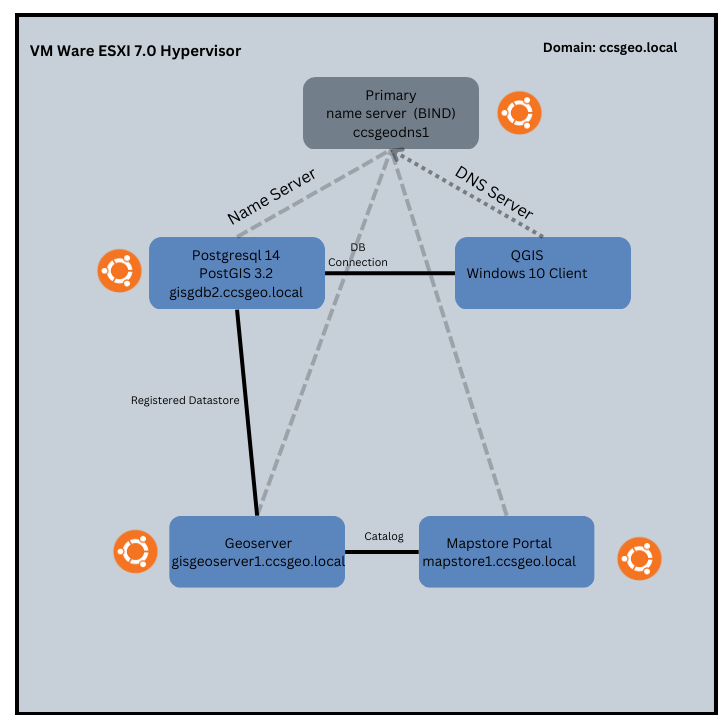
As this is a new deployment for me, there may be changes as a learn how things fit together.
Setting up the Domain
While I don’t necessarily mind typing in I.P. addresses to connect to resources in my network, I figured this would be a great opportunity to configure a domain name system. I firmly believe that GIS practitioners require a knowledge of IT infrastructure. The relationship between IT and GIS can often be fraught, and understanding the IT domain is critical for navigating these interdependent systems. I also personally find ‘clicking’ your computer resources together very satisfying. And that is definitely the case with setting up a DNS zone in your internal network.
To setup the zone, I created an Ubuntu virtual machine in ESXi and installed BIND, an open source name service for intermachine DNS name resolution. I used this great tutorial from Cherry Servers to help set this up. Essentially, there are four main components to the configuration. The first is modify the main configuration file of your BIND server in order to define which machines can query the name server:
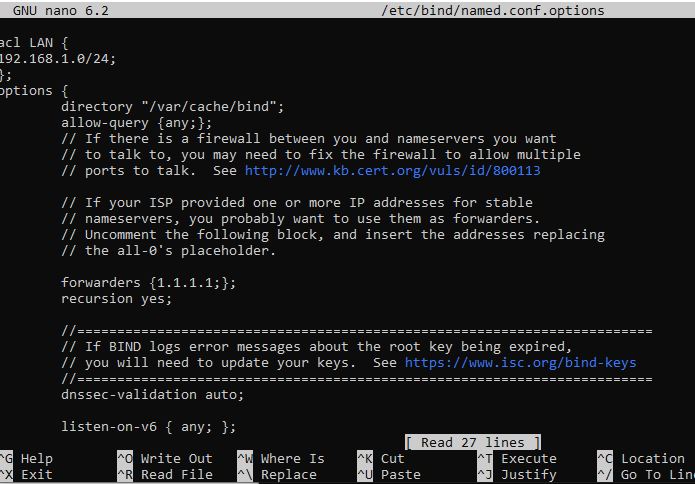
In the screenshot above, the first two lines define the LAN IP network (192.168.1.0/24). The allow-query line defines which machines can query the name server (I have set mine to any machine), and the forwarder sends recursive queries onto a Cloudfare dns server (1.1.1.1). After making changes to your named.conf.options file, you can check if your syntax is correct by:
$ named-checkconf /etc/bind/named.conf.options
The second part of the configuration is to define the files that will store the configuration options for our local zone. This part is fairly straight forward. It requires specifying forward and reverse zones for IP to Domain, and Domain to IP queries. I was a bit hung up on the naming convention of the reverse zone but this represents the first three blocks of your LAN reversed:
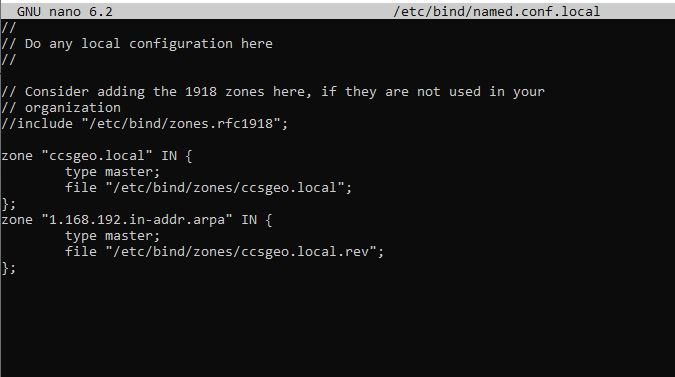
Don’t worry that this location and these files specified in named.conf.local don’t exist yet. You can create the directory using mkdir and create the files by copying the default zone files:
cp /etc/bind/db.local /etc/bind/zones/ccsgeo.local
cp /etc/bind/db.127 /etc/bind/zones/ccsgeo.local.rev
Okay, so now we have created our zone files and pointed our main local configuration file to them. Now to set up our forward and reverse zones!
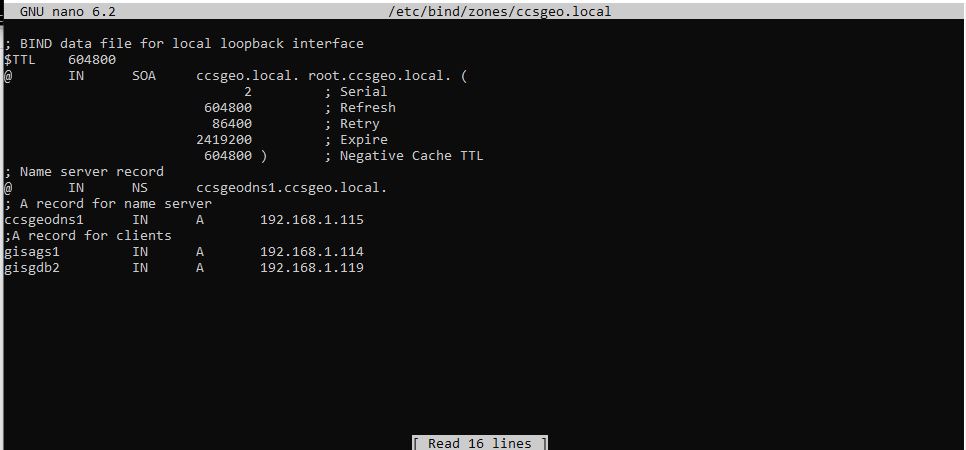
The forward zone file configures the name server record and sets an IP address for it. You can always check the IP address of your name server machine by running the command ip address in your terminal. A key syntax reminder is the periods at the end of any url. We also set the records for client machines. In my example above, I have set my name server to ccsgeodns1 at IP 192.168.1.115. The client records so far only include a test ArcGIS Server machine and my future Postgres database running on 192.168.1.119. Once finished, you can check the syntax of the file:
named-checkzone ccsgeo.local /etc/bind/zones/ccsgeo.local
Now for the reverse zone file:
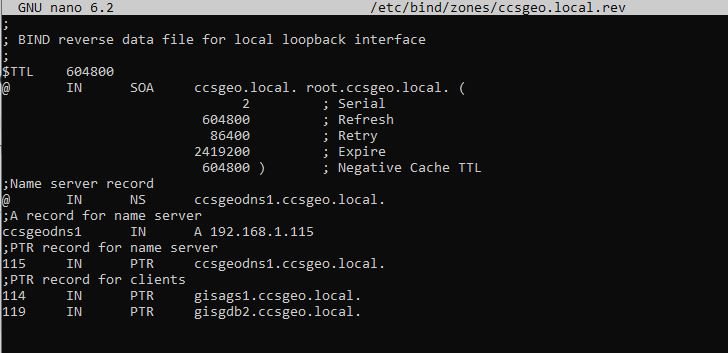
Don’t forget those periods at the end of your domain entries or you will get errors when you run named-checkzone ccsgeo.local /etc/bind/zones/ccsgeo.local. Also, the number entry for each record corresponds with the last digit of the IP address for that machine (114, 115, 119 etc).
After saving and checking the reverse zone file, restart the bind server.
systemctl restart bind9
Now for the final configuration. So far we have configured the name server to allow connections from any machine, we have configured the main config file to point to the forward and reverse zones, and we have configured our forward and reverse zones with a name server entry and domain names. All we have to do now is configure the client machines to point to this name server. This is done through the netplan configuration on each client machine.
The first step is to get the name of the ethernet adaptor, as well as its mac address. You can do this by executing ip address:

The name for my adaptor is ens160 and the mac address is 00:0c:29:92:6e:0d. With this information, we can navigate to /etc/netplan and open the default file there:

In the netplan file, we set the name of the ethernet adaptor, we specify the address of the machine and the mac address of the ethernet adaptor. I have also set the route to the default gateway (192.168.1.1), as without this, your machine cannot access the internet. I have disabled DHCP4 so that the IP for this machine is fixed and I have set the address of the name server to my DNS server (192.168.1.115).
You can now run the command netplan try to confirm the syntax of the file and apply the changes. To confirm if you can resolve dns names from the client machine, run nslookup followed by a machine name or the fully qualified domain name (e.g. gisgdb2.ccsgeo.local):

Success! I now have a domain name system setup for my open source GIS environment. As I add new machines along the way I will have to add them to the forward and reverse zones as well as configure their netplan setup in order to add them into the DNS.
Stay tuned for part two where we will set up the Postgresql database and PostGIS.

This was a fantastic read, especially for someone like me who’s learning the ropes of internal DNS setup. I got stuck configuring the reverse zone file for my local network and kept getting errors with missing periods—glad to know I wasn’t the only one caught by that syntax issue. The step-by-step approach here helped me clean things up and get my DNS up and running without a hitch.
Also, when setting up my environment, I needed Python for some GIS scripts. I was pretty lost until I came across this super helpful guide to install python ubuntu, which really cleared things up for me. This article’s practical tips combined with that guide got everything working perfectly—can’t thank you enough!
So glad to hear that this was useful for you!